
I spent about three years ignoring the cable situation under my desk. I told myself it was fine, just a power strip and a few cords. Then I took a photo during a video call and saw what my background actually looked like: six cables looping off the desk edge, a power strip sitting on the floor in plain view, and a tangle of USB cables draped over the back of my monitor arm. It looked like the IT closet of a company that had given up. The thing is, I rent. I was not about to start drilling into the underside of a desk I do not own.
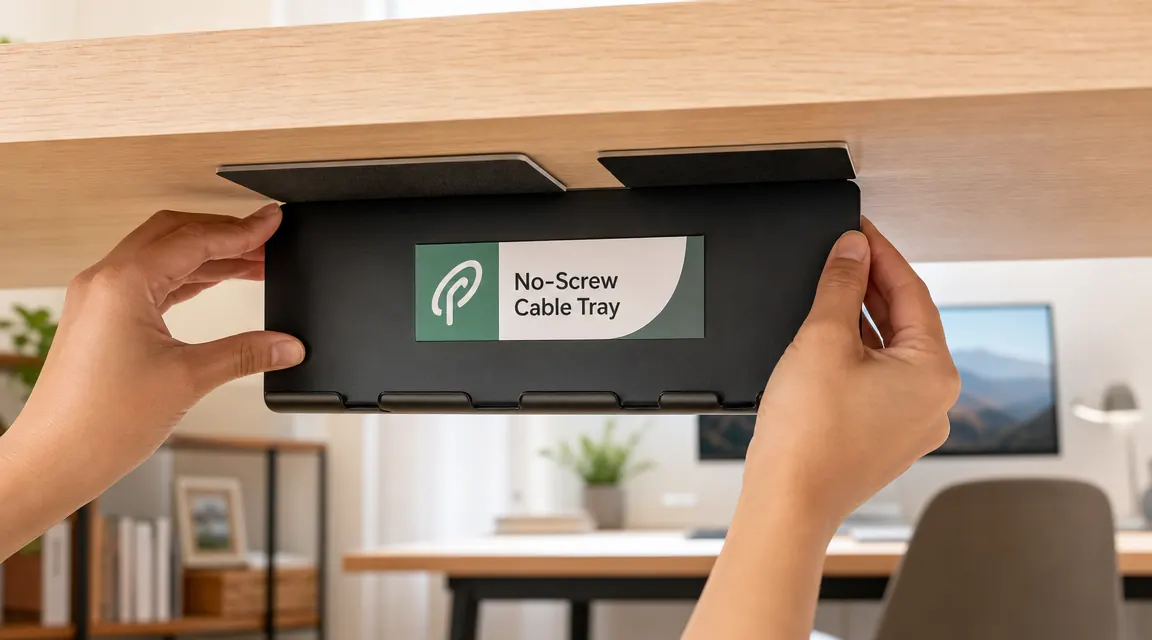
If you are in the same situation, here is the good news: you do not need a drill, a cable raceway kit, or a weekend project. A self-adhesive under-desk cable tray takes about 20 minutes from unboxing to clean desk, leaves no permanent marks, and holds up better than you would expect. This guide walks through the exact five-step process I use. The recommended tray is the No-Screw Under Desk Cable Management Tray (ASIN B09J5HH2LR), which has over 6,600 reviews on Amazon and a 4.5-star rating. It is the product I actually put on my own desk, so the instructions below are based on firsthand experience, not guesswork.
Your cables are already bothering you. Here's the no-drill fix.
The No-Screw Under Desk Cable Management Tray uses industrial-strength adhesive pads to mount to the underside of your desk in minutes. No tools, no holes, no landlord conversation. Over 6,600 Amazon buyers gave it 4.5 stars.
Amazon Check Today's Price on Amazon →Step 1: Unplug Everything and Map Your Cables
Before you touch the tray, shut everything down and unplug it all. Yes, every cable. It sounds like extra work, but trying to manage cables while half of them are still live and plugged in is exactly how you end up with a worse tangle than you started with. Pull the power strip out from wherever it is hiding, lay all the cords on top of the desk, and identify what you actually have.
On my desk I found: a monitor cable, a laptop charger, a USB-C hub cable, a lamp power cord, a webcam cable, and the power strip cord itself. Six cables. Once I had them laid out, I could see which ones run together toward the same destination and which ones branch off in different directions. That routing map matters in Step 4 when you are deciding how to load the tray. A few minutes of planning at this stage saves you from reorganizing everything twice.
While everything is unplugged, wipe down the underside of your desk surface where the tray will sit. Any dust, grease, or residue will interfere with the adhesive pads. A dry microfiber cloth is enough for most surfaces. If your desk has a painted or lacquered finish, a single pass with a slightly damp cloth followed by a dry wipe gets the surface genuinely clean.
Step 2: Clean the Under-Desk Surface for Adhesion
This step is short but it is the one most people skip, and it is the main reason under-desk trays fall off at 3 AM and scare you half to death. The adhesive pads that come with the No-Screw tray are industrial-grade VHB tape, meaning they can hold substantial weight when bonded to a clean surface. Bonded to a dusty or oily surface, they will hold for a week and then give out.
After your initial wipe-down, let the surface dry completely. If you used any moisture at all, give it a full five minutes. Cold or damp surfaces do not bond well with pressure-sensitive adhesives. If your desk is in a room that runs cold in winter, do this step after the room has warmed up to normal working temperature. Room temperature adhesive on a room temperature surface is the combination that actually holds.
Position the tray against the underside of the desk before removing the adhesive backing to confirm the placement looks right. You want the tray centered or slightly back from the front edge so it is invisible from a seated position. The standard placement I recommend is about four inches in from the back edge of the desk, centered left to right. Mark the spot with a small piece of painter's tape if that helps you line it up when it is time to commit.
Step 3: Mount the No-Screw Tray
Peel the backing off the adhesive pads on the tray. Press the tray firmly against the underside of the desk at your marked position. Push hard and hold it for a full 30 seconds. Not a quick press and release. Sustained pressure is how VHB adhesives form their bond. Work across the tray from one side to the other, pressing each pad firmly before moving to the next.
Once pressed into place, resist the urge to load it immediately. The adhesive cures over time and is significantly stronger after 24 hours than it is after 5 minutes. For a renter who wants this tray to stay in place for months or years, waiting overnight before loading weight into it is worth it. If you cannot wait, at least give it a minimum of one hour before putting any cables in.
After cure time, give the tray a gentle tug downward with a few fingers to test the bond. It should not budge. The No-Screw tray is rated to hold up to 15 lbs when properly installed, which is more than enough for a power strip and six cables. If it feels at all loose, press it again and wait longer. A loose tray usually means the surface needed more cleaning, not that the adhesive is defective.
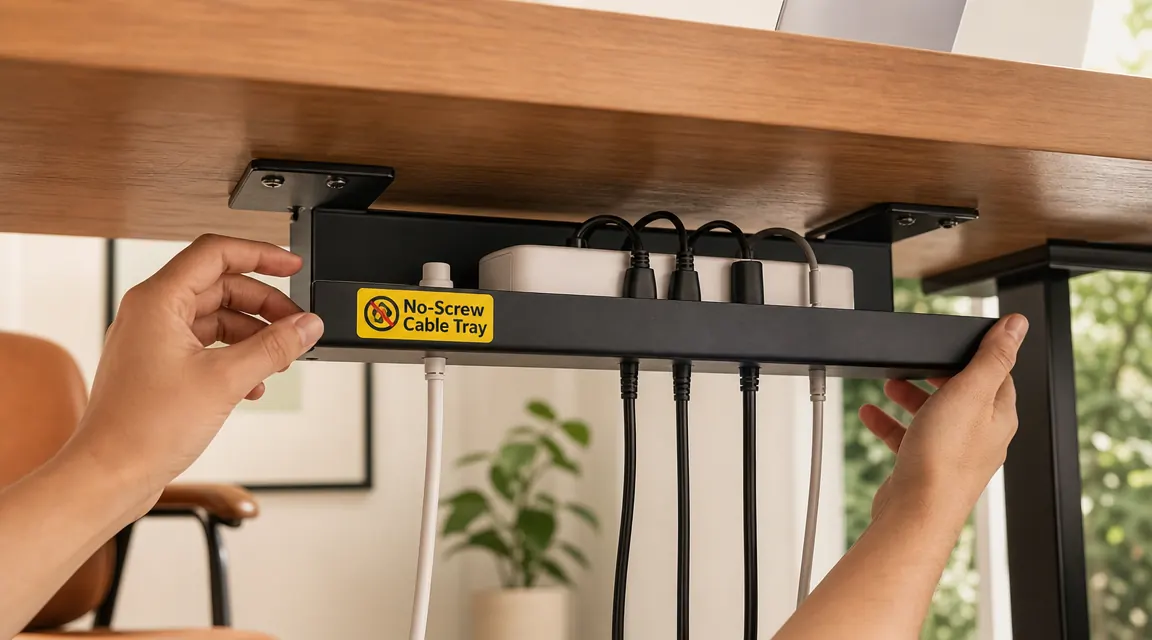
Step 4: Load the Power Strip and Route Your Cables
Start by setting the power strip inside the tray. Most standard 6-outlet strips fit lengthwise in the tray with room on both sides for cables to rest alongside it. Lay the power strip in first so it anchors the tray load and you can route cables in around it. Feed the power strip's own cord toward the wall outlet, keeping that run along the back of the desk and down the nearest leg.
Now route your device cables one at a time. Plug each cable into the power strip, then lay the cable slack inside the tray before running it up to your device. The goal is to have the cables travel horizontally inside the tray and only emerge at the desk surface where needed, rather than hanging loose and visible. Cables that need to reach your monitor or laptop can be routed up through a small gap at the back of the desk between the tray and the desk surface.
If you have cables of very different lengths, the tray lets you coil the excess inside rather than having loose cable loops on the floor. My webcam cable is about two feet longer than it needs to be, so I fold the excess in a loose coil inside the tray and clip it with a small velcro tie. The tray hides the coil completely. This is one of the practical advantages of an under-desk tray over a cable box on the floor: the cable runs stay up at desk height, which means shorter visible runs to each device.
Step 5: Bundle and Label the Runs
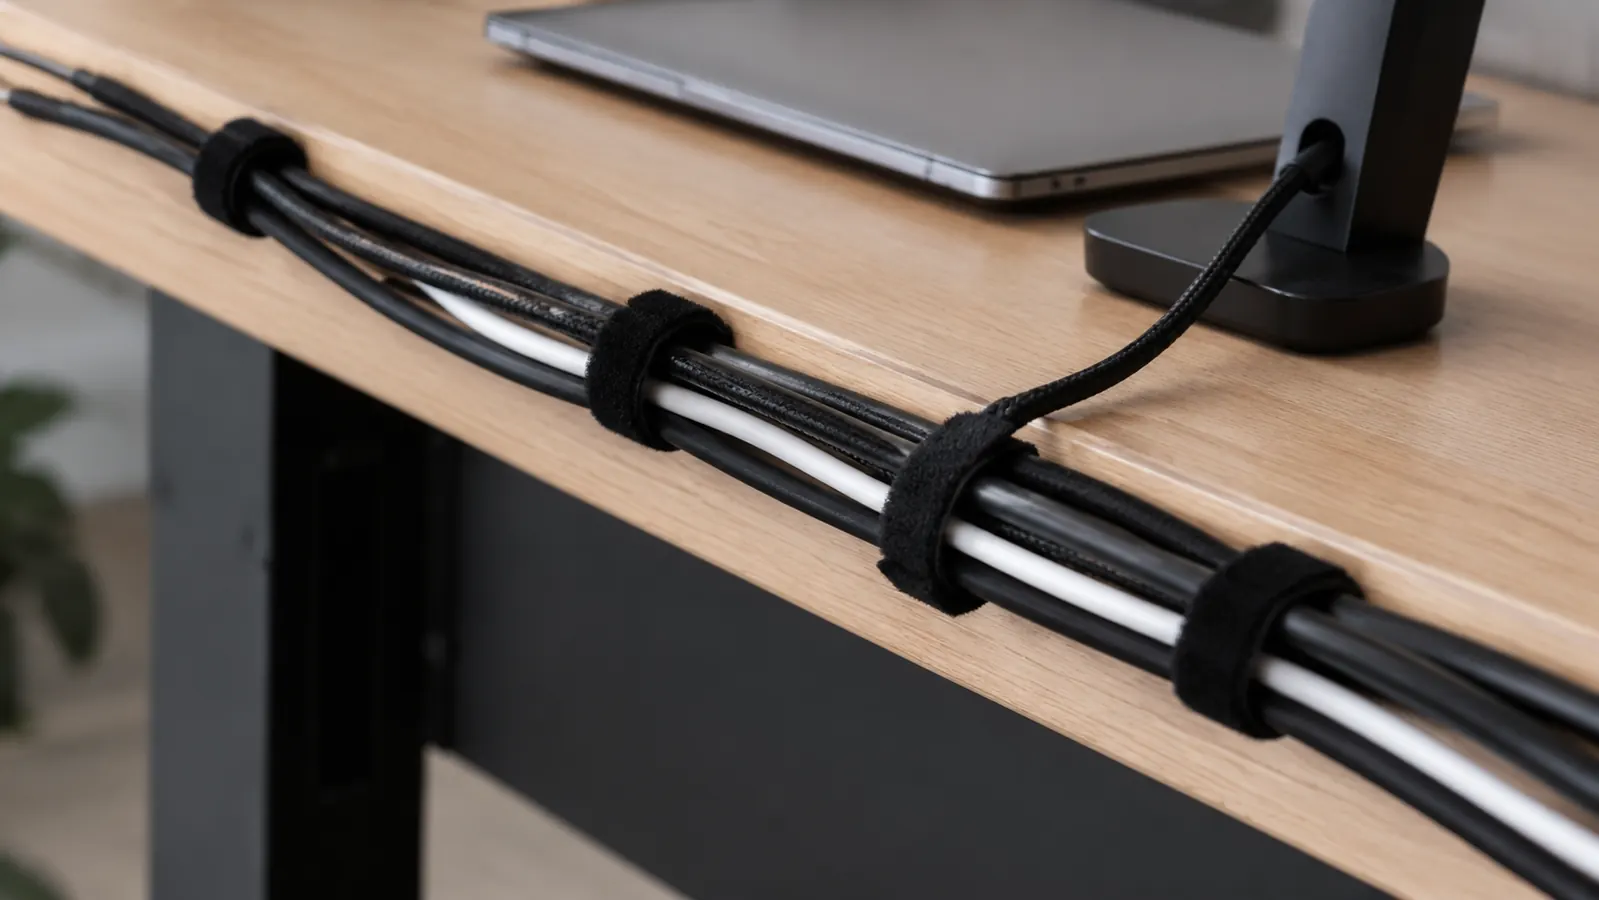
With all cables loaded into the tray and routed to their devices, the last step is bundling and labeling the runs that are still visible at the back of the desk. I use velcro cable ties rather than zip ties because velcro lets you adjust or remove a cable without cutting anything. Run a tie around every group of cables that travel in the same direction. For most setups that means one bundle going left toward a monitor, one going right toward another monitor or the wall, and one going straight back to a docking station or hub.
Labeling sounds optional but it pays off the first time you need to unplug one specific cable without pulling the wrong one. Small adhesive cable label tags are sold as a pack and cost almost nothing. I label mine with a standard code: M1 (monitor 1), M2 (monitor 2), LP (laptop), LMP (lamp), WC (webcam), HUB (USB hub). Six labels, applied once, saves ten minutes of trace-the-cable frustration at every desk reconfigure.
Once bundled and labeled, step back and look at the desk from your normal seated position. The only cable visible should be the short runs from the back of the desk to each device. Everything else: the power strip, the excess cable length, the routing tangle that used to sit on the floor, is now inside the tray out of sight. That is the result most people expect from a $200 cable management kit. With an adhesive tray and some velcro ties, you get there for a fraction of that.
What Else Helps
The five steps above handle the bulk of the problem, but a few small additions round out the setup. Adhesive cable clips along the back edge of the desk keep individual cables from drifting forward into view. A short cable sleeve, the braided fabric type that zips closed, is useful for the final run from the back of the desk down to a floor outlet if you cannot route it behind furniture. And if your desk has a grommet hole, use it. Running cables through a grommet and down the leg keeps even the short visible runs clean. None of these are required. They are the detail layer you add once the tray is in place and you want to take the setup from tidy to genuinely polished. For a deeper look at how the tray itself performs over months of use, read the full under-desk cable tray review. For the research on why cable clutter actually affects focus, the listicle on clean desk cables and focus is worth a few minutes.
The only cable visible should be the short run from desk edge to device. Everything else belongs inside the tray, out of sight and off the floor.
Ready to stop looking at those cables? The no-drill tray ships fast.
The No-Screw Under Desk Cable Management Tray mounts with industrial adhesive pads, holds a full power strip plus six cables, and leaves zero marks when removed. Check the current price on Amazon before you buy anywhere else.
Amazon Check Today's Price on Amazon →